Monday, December 22, 2008

Keepsake flowers

Freeze Dried Flowers


Weddings are one of those special occasions where you want to remember as much about the day as possible. To help grooms and brides capture those memories for years to come there's photos, cards and favors. But what about those flowers?

I loved my color choices and the arrangement Burge Flower Shop, Asheboro, N.C., created for Chris and my wedding this past April. So I wanted a way to preserve those as well.

Luckily, I had discovered Gina's Freeze Dried Flowers last December at a bridal shower at Castle McCulloch, Jamestown, N.C.

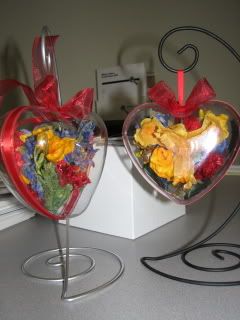
For a little more than 30 bucks, Gina Wolfe freeze dried my bouquet and my dad's boutonnière and arranged them in heart-shaped ornaments (seen above). Now my parents and Chris and I have another way to remember that special day.

Gina can also make arrangements in frames — starting at a little more than $100.

Always make a model

It's always a good idea to make a model on any project you plan to give as a gift.

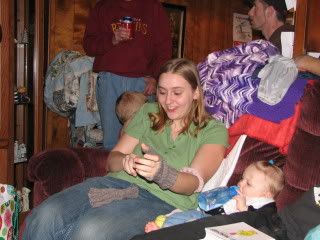
These gloves were such a perfect fit, that I knew I could whip up a second pair with confidence and know that my sister would love them.

Gloves

And she did.

Jamie and gloves

The pattern is from Debbie Stoller's "Stitch 'N Bitch: the Happy Hooker," a pattern book I talk about often.

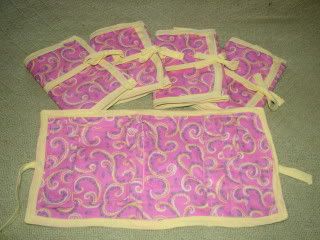
I did become quite frustrated making these jewelry totes, pattern from Betty Oppenheimer's "Sew and Stow." But after going through five needles (yes, I broke four), I finally whipped these things up in time for gift exchanging yesterday. (Note: Do not attempt to sew over zippers. Make sure you knew where they are located in your fabric!)

Here are five, but I made eight, including the test I am keeping for myself.

Jewelry tote gifts

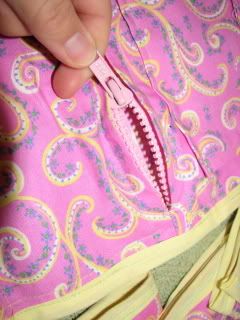
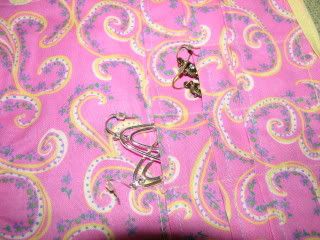
This is a zipper pocket to hold necklaces and bracelets.

Jewelry tote zipper

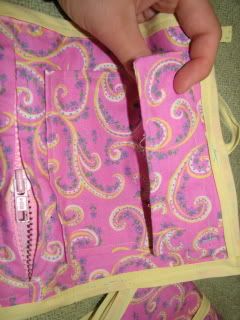
Here is a pocket with a flap. It's supposed to have hook and eyes, but I didn't like that idea. It was too late to buy Velcro or snaps, but I think this will work fine without any type of closure.

Jewelry tote pocket flap

These are ear ring pockets in large, medium and small.

Jewelry tote ear ring holders

The tote also has yellow double-fold bias tape along the edge for binding and along the back as a tie.

I used yellow thread on top and blue in the bobbin because I really liked the effect. Unfortunately, the color combo displays my amateur sewing skills along the binding.

Other Christmas gifts included these birdies for niece Bridgette and this hat and hacky sack for brother-in-law (and Bridgette's dad) Aaron.


Wednesday, December 3, 2008

Interweave buys CrochetMe.com

Kim Werker, owner of CrochetMe.com and editor of "Interweave Crochet," has announced she's sold her Web site to Interweave.

But no fears, Werker and Interweave promise to keep the site free and users will continue to own the information they post. The only thing changing -- more features. Neither Werker nor Interweave explained what those features might be.

Werker has also stepped down as editor of "Interweave Crochet." She'll remain as creative consultant and blogger for CrochetMe.com.

Werker founded CrochetMe.com in 2004.

Friday, November 28, 2008

Cranberry-Orange Relish and PawPaw Recipes

I made cranberry-orange relish yesterday as a Turkey Day side dish and I believe the orange in both the relish and my first attempt at pawpaw preserves is what I don't like.

My aunt, Shirley, did like the relish. I think she and I are the only ones that tried it. I used the recipe on the back of the cranberry bag:

Cranberry-Orange Relish

1 bag (12 oz.) cranberries, rinsed
1 medium orange, seeded and quartered
3/4 cup of sugar, more or less to taste

1. Chop the cranberries and orange in a food processor.
2. Add 3/4 cup of sugar to the dish. Add more or less to taste
3. Let set for several hours or overnight in refrigerator before serving.

I could have used more sugar to see if that would have balanced out the twang of the orange. I also probably didn't peel off enough of the pith (white part on the orange) and that's bitter.

For next year's batch of pawpaws, I plan to use a recipe a woman gave to Chris when she learned I was canning some of our fruit:

PawPaw Butter

1 1/2 quart pulp
1 quart sugar
1 package of Sure-Gel
1/4 lime or lemon juice.

Hopefully I'll like this recipe much better than our own.

Homemade Christmas Tree Ornaments


One of my grandmother's neighbor gave me a handwritten recipe book as a wedding gift earlier this year. It's filled with medicinal and food recipes, conversion tables, substitution suggestions and stories.

One recipe is for homemade Christmas ornaments using staples from your kitchen. The neighbor said she copied the recipe from a magazine years ago. Here's what you need:

Homemade Christmas Tree Ornaments

1 cup Morton or other table salt
2 cups flour
1 cup water
cookie cutters

1. Mix salt and flour in a bowl. Stir in the cup of water a little at a time.
2. Knead dough 7-10 mins. until dough is firm.
3. Roll dough out about 1/4 inches thick. Use cookie cutters to cut out the ornaments.
4. Poke out a hole in the top of each ornament using toothpicks or other tool.
5. (Optional) Decorate each ornament by drawing on them or adding other pieces of dough with water for a 3D effect.
6. Bake on a cookie sheet at 325 degrees for 30 mins. or until hard.
7. When cool, brush varnish over the ornaments to protect them from moisture.
8. Paint ornaments and decorate them using other craft items, such as glue and glitter.
9. Threat, yarn, ribbon or wire can be used to hang the ornaments on the tree.

Monday, November 24, 2008

Easter Egg hunting in the fall and a Christmas flop


Have you heard of the pawpaw fruit?

Many people may be familar with the traditional childhood folk song that refers to them, but many people have never actually seen or tasted a pawpaw.

According to The PawPaw Foundation, the fruit is a native to the Americas and can be found near creeks and rivers in forests of eastern United States. The fruit sort of looks like a banana and has a very tropical scent.

Chris and I have five, fruit-producing pawpaws at the bottom of our property and there are several more smaller ones growing but not yet old enough to produce fruit.

My grandmother, whom I affectionately call Nannie, was so excited to learn we had pawpaw trees. She used to sit under her uncle's pawpaw trees and eat the fruit with her cousin, Madeline. She immediately ate one earlier this season when I brought a few to share with her.

The last couple of years have been too dry for the sensitive trees to produce any fruit. But this year we had a bounty.

So, I decided to gather some of the fruit and turn them into preserves. It was like Easter egg hunting in the fall. Supposed to be 3-6 inches in length, our longest fruit was 3 inches. I had to search among tall, green grasses and weeds to find the grass-colored, egg-shaped fruit.

Deseeding the fruit was not fun. It took hours to find the best way to extract the long, slender seeds. Chris and I finally decided the best way was to separate the seeds from the fruit was to use a colander with big holes and to manually pick out the seeds from the cooked fruit.

I used this recipe from the Kentucky State University for the preserves:

Pawpaw Preserves
12 pawpaws (about 5 lbs.)
2 cups water
3/4 cups sugar
1 lemon
1 orange

Peel pawpaws. Put in kettle with water, without removing seeds. Boil until soft, then put through a sieve. Add sugar and juice of orange and lemon. Boil until thick. Grated rind of organge or lemon may be added. Put in sterilized jars and seal.

I tried the fruit for the first time this Sunday. I wasn't impressed. Neither was Chris. But I'm not one for citrus type preserves, such as citron, so maybe it's just not my thing.

The Kentucky State University site also lists several other types of recipes that I'm willing to try, such as cookies.

Needless to say, the pints I stashed away for Christmas may not make it into gift bags. Except maybe Nannie's. She loves pawpaws.
Isabella Amaya's gift

I cohosted a baby shower for a friend Nov. 16. Everything turned out great, but I couldn't have done it without the help of my cohost, Katy, and two other people.

As promised, here's a picture of the blanket and hat I made for the soon-to-arrive bundle of joy, Isabella Amaya.


The pattern is from Debbie Stoller's Stitch 'N Bitch: The Happy Hooker. It's a wonderful crochet book for beginners and I recommend it to knitters and beginning crocheter's alike.

Seen here is Isabella's parents, Alice and Brian. Congrats, you two!

Monday, November 17, 2008

Recycle those bottles . . .

. . . into ornaments!

Here's another quick and easy project to make your own Christmas decorations. Thanks to esprit cabane, the magazine of crafty and green living ideas, for the how-to!

Friday, November 14, 2008

Local fashion show

There's a new trend in the fashion industry to upcycle old, worn out and vintage clothing.

Kelly Cox will debut her upcycled clothing line, Nouveau, this Saturday at Design Archives, 338 Tate St., Greensboro, N.C.

For more info on Cox or the event, check out News and Record reporter Tina Firesheets' feature.

For more information on upcycling, visit here or here. You can also google "upcycling" and find projects to reuse items from old clothing to plastic bottles.

Lighted Tree Ball

News & Record (Greensboro, N.C.) has a great tutorial on how to make lighted tree balls. Go on over and check out the multimedia. All you need is some chicken wire and mini Christmas lights.

Wednesday, November 12, 2008

A economical way to decorate this Christmas

If you're like me, you love to decorate. Especially around Christmas time.

I've wistfully been eyeing new red and white poinsettia garlands, snowmen window cling-ons and bright, shiny lights for the holiday season. But with a dark cloud of possible layoffs lingering over my household and the downturn in the economy, I've been clutching my purse close.

But here's a brilliant idea. How about making decorations?

Craftstylish has a wonderful idea -- an origami reindeer made from interfacing -- and so does BurdaStyle -- an Advent Calendar wall hanging.

Interfacing is used in sewing, so you'll find it at any of your local stores that carry fabric. If a reindeer isn't your thing, look for other origami shapes. Interfacing will help your creation hold its shape and stand on its own.

Many people celebrate the days leading up to Christmas with Advent Calendars. Commercial calendars are little cardboard packages with punch out windows for each day. Inside each box is a little bit of candy.

Burda's twist is little stockings filled with treats. The dates can be embroidered or appliquéd on the front of the stockings.

If I think or find any ideas, I'll share them as we near the holiday season. Feel free to share any of your own ideas.

Wednesday, October 29, 2008

How to Crochet in a Circle

Okay. So this isn't the best video. But give me a break. It's my first one. :)

A lot of patterns tell you to crochet 4 chains and join them with a slip stitch to create a circle, right? These directions are common in hats and in the birdie and hacky sack patterns I used for the gifts I showed in the previous post.

But I say that's not the best way.

Instead, crochet in a circle so there's no hole, like the one created by the techique used above, and sew the hole closed with the tail of the yarn.

If you have trouble viewing the video below, go to YouTube and search for either my name (easbrooke) or the title "How to Crochet in a Round."

A four-day weekend of gift making

Chris and I recently took a second honeymoon to Gatlinburg, Tenn. We spent a Saturday through Wednesday traveling the Blue Ridge Parkway and gallivantin' around in Tennessee.

And I still had Thursday through Sunday left to fill up with activities. What to do, what to do.
So I swore off any house cleaning, other than laundry, and crocheted to my little heart's content.
But after that week of bliss, I was ill and didn't get much crafting or house cleaning done the next week. Therefore, I'm behind in sharing these fun projects.

I finished an afghan I had been working on for months. The pattern is from Leisure Arts' "I Can't Believe I'm Crocheting." I've seen a reprint of the book at various craft stores, such as Hobby Lobby and my own local deBeez House of Herbs and Yarn, Galax, Va. There's also a new version of the book, featuring knitter, crocheter and designer Melissa Leapman, but I don't know if it has the same patterns or what it's like.


It's Chris' afghan, so he picked out the colors: a tan yarn, a tan and cream variegated yarn, a reddish-orange yarn called paprika and a black yarn variegated with cream, reddish-orange and browns. It's nice and cozy!


I also came close to finishing these little birdies. My friend, Kelly, pointed out the pattern for them on Ravelry. I fell in love with them! These, once stuffed, will serve as a Christmas gift for one of my nieces, 6-month-old Bridgette. Since she's still a babe, I sewed on the eyes and bills instead of using felt or craft beads. I felt that would be safer.


The yellow one is a baby chick, the green is a baby parrot, inspired by my mom's new Quaker parrot, and the blue is a baby blue jay.

My friend and yarn pusher, Debbie Worrell of deBeez House of Herbs and Yarn, suggested stuffing leftover yarn into the birdies. I like this idea and have been slowly collecting a pile of scraps as I clip along on projects. If I don't have enough by Christmas, I'll either use yarn from skeins I'll probably never use or I'll buy some polyfill.

I also finished and stuffed this hacky sack for Bridgette's dad and my brother-in-law, Aaron. I was a little surprised that he asked for this as a present, but I made him one using leftover yarn from Chris' blanket. I filled it with rice.


I also found the pattern on Ravelry.

In the past week I also finished a hat for Aaron. I haven't taken a picture of it nor of a blanket and hat set I've made for a friend's soon-to-arrive infant as I haven't had time. Maybe later. But I'd like to keep some things a surprise until the said items are in the hands of the recipients. So maybe I'll share pictures later.

I will say that the patterns came from Debbie Stoller's "Stitch 'N Bitch Crochet: The Happy Hooker," a good handbook for those learning to crochet or those who can't seem to remember how many chains to do at the end of a row for half-double crochets, double crochets, triple crochets, etc. It's full of more modern, youthful patterns that you won't find in most books or magazines.

I also recommend Stoller's other books "Stitch 'N Bitch: The Knitter's Handbook" and "Stitch 'N Bitch Nation," also a knitting book.

Friday, October 10, 2008

A beautiful quilt

One of the blogs I check regularly is fellow journalist Jennifer Ackerman-Haywood's blog and podcast "CraftSanity." Ackerman-Haywood also writes a crafty column for The Grand Rapids (Mich.) Press.

Recently Ackerman-Haywood and daughter Abby attended a local quilt show where they picked an entry to receive a judge's award.

Now, I'm not a quilter and don't think I ever will be unless I gain more patience, but I can appreciate all the hard work and creativity that goes into making one. And, I say, this is a marvelous quilt!

You can view this creation, titled "Lemonade Stand," by Marcy McAllister of Allendale, Mich., here.

Thursday, October 9, 2008

Fixing the shrink

Preshrinking material is important, I tell ya. Most people try to skip this step and continue on with cutting out fabric and sewing. But what will you do when you first wash the material and it shrinks? You're stuck with a beautiful garment that only a child could where.

But what do you do if the fabric shrinks and you don't have enough material to cut out the all the pattern pieces?

As I was cutting out a skirt pattern in a recent sewing class, I found my material had shrunk from 45 inches to 39 inches wide. This left me with about 3 inches less than was needed to cut out the back section of the skirt. What to do, what to do?

Class instructor Margaret Christie came to the rescue. She attached more material at the end, as seen above. You can see the seam above my thumb where material was added on. The seam was used as the fold for the hemline. The skirt is now a little bit shorter than I wanted it, but it would have been 2 inches shorter if we hadn't added on material!

Monday, September 29, 2008

After talking with a friend and learning she didn't know what many of the things were that I discussed in my last post, I thought I'd give a quick tutorial. I may do this from time to time to clarify any tools or techniques if you so desire. Just let me know!

As a demonstration, I'll use the pair of pants I discussed in the last post.

A hem is the bottom or top of a garment that's folded over and sewn to create a smooth finished edge. In the picture below, it's the thread that is sewn horizontally. This is the bottom of one of the pants legs.


A seam is the area where two pieces of material are joined with thread. In the picture above it's the thread that runs vertically. Below it's where the material comes together, located horizontally.
Outer leg seams are the sections were the back and front of the pants meet at the thigh/outer area of your leg and side.

Inner leg seams are the seams 
that hold the front and back of the pants together from the crotch down to the edge of the garment.

The casing is this folded over and sewn material that holds the drawstring for the pants. This is really tricky as it requires a lot of folding, ironing and sewing and you have to be careful not to sew too far toward the middle of the casing or you won't be able to pull the drawstring through! Here is a picture of the casing:


A seam ripper is your friend. And, as I learned the hard way, it can be your enemy. It's used to rip out the threads from sewing if you need to make some adjustments or if you made any mistakes. Seam ripper:


The seam ripper is sharp. It'll rip your fabric if you're not careful. But since a shirt will cover the casing most of the time, I decided not to worry about fixing the problem because that would probably require either a small patch or creating a whole new casing.

Sunday, September 21, 2008

Finally!

I've been working on these pair of pants for weeks now:


And I've finally finished!

When I first completed the pants a few weeks ago, I was discouraged to find the pants were too big. I mean huge! I looked like I was ready to audition for the circus.

So the past few weeks I've been mulling over what to do to correct the mistake. Do I have to take out every single hem? How much should I take out?

After much thought and discussion with my mom and some other people, I decided that I've worked much too hard on these pants for them to go to waste. There's not much warm weather time left so time was running out!

So I took off the casing, which is at the top and holds the drawstring, and undid the hems at the bottom. But I left the hem at the top. A classmate in my sewing class, which I'm taking through Oct. 7, suggested no one would see the top hem, so leave it. So I did.

Unfortunately, all that seam ripping didn't come without casualties. I tore a small hole in the casing. But, I refuse to worry about it! It's a small hole and hopefully no one will notice since a shirt will cover the top of the pants most of the time.

After taking out the seams and casing, I marked an inch from each outer leg hem and sewed 'em up. I then tried the pants and decided to take out 3/4 inches more. Now the fit was just a tad tight in the hips, but otherwise fit nicely.

So I trimmed off the excess material, reattached the casing and drawstring and hemmed the legs. Perfect!

I wore the pants yesterday to visit family and go to a show with my hubby.