Wednesday, December 14, 2011

Pjs and wheelchair bags

Hiya!

By Wednesday, my official third day off from studying, I'd already done more craft-wise than I've done all year.

Do you remember the pjs I made for Chris awhile back? Well, I used more of the same remnant fabric and made me a pair.


There are four pleats in the front and two pleats in the back. The shorts are hard to pull up over the hips, but fit wonderfully once I get them up. I think, next time, I'll leave off the front and back pleats to see if that'll make the shorts more comfortable to pull up.

Also, in this post, did you see the button I sewed back onto Chris' shorts? It fell off within in a week. Turns out the button was broke! I figure I need to find the shorts and attach a new button in the coming week, too. I'll do that when I'm mending some jeans.

Actually, a lot of jeans. Many of my jeans have holes in the thighs. I've researched the various ways to mend jeans and I think I'm just going to go with the traditional patching. The holes are pretty big and I don't really care for anyone to see my inner thighs or have crazy stitching in that area, so this really is the best option.

But, if you're not interested in just old fashioned patching, here's some other ideas: soluble stabilizer and crochet patches. All three of theses are courtesy of Craftzine and Instructables, two sites worth checking out for tips, projects and how-tos.

And, back in October, I started a ministry at church — a knitting, crocheting and sewing ministry. Currently we're making wheelchair/walker bags for area nursing home residents. I hoped to have several made by Christmas, but haven't had much luck getting people to participate. Right now I have one lady who always joins me at the meetings every other Saturday (but she sort of has to since she has the key) and three ladies that occasionally show up when they can, but not very often. One lady, whom I've only talked to via phone, sent me a really cute bag made out of a kitchen towel.


So far the grand total is 5 bags. I've got one crocheted bag made and another cut out and ready to be sewn together. Another piece of fabric has been washed and ironed and is ready for cutting.


Our target goal now is February for Valentine's Day. If you're interested, this is the pattern we're using (or click here for the pdf).

Monday, December 5, 2011

BurdaStyle's Christmas giveaways

In case you've forgotten, BurdaStyle's annual Christmas giveaway is currently underway.

Stop by daily to check out the prizes and comment to win!

Good luck!

Sunday, September 11, 2011

Pjs, some hemming and a quick update

Hello! How've you been? Did you think I forgot about you? :)

I just finished a pair of pj shorts for Chris this afternoon. It felt great to finish a project and have something to show you.


I have much more of this fabric and plan to make me a pair of pj bottoms, too. That's actually next on my list, as well as, a shirt for me.

I also sewed a button (for the second time) on a pair of shorts this afternoon. I'm not sure how the it fell off the first time, but I made sure to sew it on extra tight this time. I'm not sure how that man loses his buttons. :)


And, weeks after buying them, I finally got around to hemming two pairs of jeans for Chris. We bought them at Ross Dress for Less (my favorite store!) for about 20 bucks or so. Usually we have a hard time locating some good prices on jeans for Chris, so, though they were too long, I encouraged him to get them if he liked them.


But then I forgot about them. Oops!

So, now they're ready wear. Hope he likes them. :)

And, a quick update. I've returned to the classroom!

As you've probably noticed, a lot of my personal obligations have fallen by the wayside. It's been a big adjustment, but I'm excited for the opportunity and glad that I can concentrate on this full time.

So, I can't promise I'll post weekly, but I'll post when I can. Sharing my projects and recipes are still very important to me, but I've had some major changes in my routine and it's been a lot to get used to.

Friday, August 12, 2011

Cake mix (from scratch)

Many of the cook books I have unfortunately include cake recipes that call for a cake mix. I don't really like mixes because they always seem to get a funky taste after a couple days. They also don't stay as fresh as from-scratch cakes.

Last night, as I was flipping through some recipes, I came across a chocolate cherry cake that I really wanted to try, but it called for a Swiss chocolate cake mix.

I was not going to give up! So I googled for "homemade cake mix." I found a couple of good sites, including yellow and white cake mix over at Chickens in the Road.

For chocolate cake mix I found and tried Shirley's recipe posted on her blog, Choosing Voluntary Simplicity. Here's the results:


I made a chocolate butter cream frosting that has coffee in it. I think it'll be a great complement to the chocolate-cherry cake.

Happy early birthday to me! (Just 12 days early.)

- Posted using BlogPress from my iPad

Wednesday, August 10, 2011

Mango fruit leathers and kitchen disasters

Over the weekend I whipped up my first batch of mango fruit leathers.


It was a lot easier than I thought it would be, and the fruit dried a lot quicker than I expected. I'm still learning how to use my dehydrator, but I'm getting better at it each time I use it.

I made three sheets. Two were dried on wax paper since only one fruit leather tray came with my dehydrator. The manual said use plastic wrap, but I'm leery of doing that for various reasons.

Well, that was a mistake! The mango melted into the wax paper! So I had to throw away both batches. I was able to get nine strips out of the fruit leather tray.

I couldn't find fruit leather trays (also called fruit roll-ups) locally, but I found some online. Four new trays should arrive in time for my birthday. I can't wait to try it again!

The other kitchen disaster I had over the weekend involved mayonnaise. I don't usually keep mayo on hand, but really wanted some to go on a tomato sandwich. (Thanks, Brian, for the tomatoes!)

I used a recipe I've used in the past, so knew it would turn out great. But it didn't. I was left with a runny mess. I tried it again, figuring I added the olive oil too quickly. Yep, that was it. So, make sure you add in oil in very small quantities if you ever make mayo!

Wednesday, July 27, 2011

Summer Squash Saute

I took of some of the squashes I got from our garden the other night (see here) and decided to try out a new recipe.


This is called Summer Squash Saute. It's from Frances Musser of Newmanstown, Pa., and is a recipe she submitted to "Taste of Home." I found the recipe in a "Savings Pack," which is attached to several other recipes Nannie used to create a recipe book for me.

Nannie used twist times to hold recipes from several sources together.
Tada! Instant cookbook.
Here's the recipe.

Here's the recipe with photos of the steps below:

Summer Squash Saute

1 bacon strip, diced
1 tbsp. onion, finely chopped
1 tbsp. each of green, red and yellow bell peppers, finely chopped
1 garlic clove, minced
1 medium yellow summer squash, cut into 1/2-inch cubes

1. Cook bacon until crisp over medium heat.
2. Add onions, peppers and garlic and cook until tender.
3. Add the squash, cover and cook until tender (about 5 minutes).

Plate and enjoy!

Here's what I did:

Add the chopped bacon and cook until crisp.
While the bacon cooks, cut up the veggies: onion, garlic, pepper and squash.
I only used green pepper.

Cook the onion, garlic and pepper until tender.

Add the squash, cover and cook until squash is tender, about 5 minutes.

Ready to eat!

Tuesday, July 26, 2011

Squashes


I found these in the garden last night. I had a smile on my face all evening. :)

Our garden has not done well this year but these squashes, especially the volunteer winter squashes, have been a treat.


- Posted using BlogPress from my iPad

Monday, July 18, 2011

Cowl-neck, stripey Sadie tank

OK. I actually finished this a week ago, but have not had time to post it.


I used the same BurdaStyle pattern as this shirt, but used the version that adds a cowl neck.

The Sadie has a nice fit to it, I think. It's a little snug, but I like it. I could go up another size, but then I think it would be too large.

This material is from the stash Nannie gave to me. I did not cut it so that the material would stretch from seam to seam (which would be the correct way) because I wanted the stripes to be horizontal. Getting the shirt on, therefore, is a little tough, but not impossible.

I had plenty of material, so the neck and arm bindings are made from the same material, making them softer and lay better than my first Sadie tank top. (You can't see the neck binding as it's behind the cowl neckline.

I didn't like the shirt at first. I thought maybe it was too tight or didn't look like a good fit. But after I wore it for a day, I really fell in love with it!

What do you think?

Saturday, July 9, 2011

Sweater update

Just a quick update on Chris' sweater.


Only 2.5" left to knit in the round before I can bind off!

I'm just about finished with one sleeve! Then on to the final sleeve, assembly and the collar.

As you have probably guessed, I've sort of dropped out of the 2011 Sweater Challenge. I should be completing sweater 3 by now, not still working on No. 1.

But I'm fine with that. I've been enjoying myself anyway. And I do have yarn for the second sweater, which I hope to start before fall. :)


- Posted using BlogPress from my iPad

Friday, July 8, 2011

Finished scrapbook!

I just finished my second scrapbook!

I had forgotten the second "s" and had to create a strawberry out of an "e." :)

I started this scrapbook of desserts a few years ago when I first started scrapping.

In it I've placed all the dessert-related recipes I've collected over the years, including family recipes.


On this page I've got Mom's "Cherry Crunch," Nannie's "Canned Apple Pie Filling"
and Chris' Aunt Faye's "Ginger Cookies."

I had bits of pages and papers sitting in piles and in bags, getting wrinkled and torn. I figured if I were to ever use these treasures I better organize them for easy use and safe storage.

I've got plans for scrapbooks to house appetizers, drinks, soups and breakfast; beef and pork; and chicken and fish. But those books will probably be smaller than a 12" by 12" book.

The dessert book won't fit in the closet with the other cookbooks! I could attribute that to poor planning, though I think the cookbooks were upstairs in our attic loft when I started this book. Oops! Oh, well. The book has currently found a home on a shelf on our small TV table.

Here's a few of my favorite pages. Please excuse the dark spot on the pics. I can't seem to get my Nikon cleaned. I think it's time to get the body professionally cleaned. Oh, and get a new lens. After months of the glass falling out, the old wide angle finally fell apart this morning!


First page of an apple-themed spread.

Second page of the apple-themed spread!

This page has the pumpkin pie I make nearly every year. My family loves it and requests it often.

Pies, pies, all kinds of pies!

Next up will probably be our wedding album. I don't have books for the other recipe books yet, but the wedding album is ready to go with photos, paper and mementos.

- Posted using BlogPress from my iPad

Friday, June 24, 2011

Tofu scramble

Our local Super Dollar just started carrying tofu so I bought a box of super firm, cubed the other day.

This morning I thought I'd whip up some breakfast using it. I decided on a Tofu Scramble:

The tofu scramble before I added in the spices. (Photo taken with my iPad)


The finished tofu scramble. (Photo taken with my iPad)

This was a pretty tasty dish. Some things I did differently:
- I didn't use onion powder since fresh onions were in use.
- I used half of the garlic powder because I added some fresh garlic, too. (I love garlic!)
- I added salt and pepper at the end.

How do you use tofu?

Thursday, June 23, 2011

Knitting and Crochet HD app

Remember me asking about the Knitting and Crochet iPad app?

Since I now have an iPad, my interest is piqued once again.

I've found it in the app store and took a closer look. It has 4 out of 5 stars, so it seems like it's worth getting. And it's currently $2.99 instead of $4.99.

But I still don't know if it's worth the cost.

Here's what it has:
- 20 patterns,though it doesn't say how many are knitting and how many are crochet and you can't preview all of them before you buy
- fix-it instructions with photos
- Stitch guides and how-tos

At $2.99 I'm tempted to buy it. Twenty patterns and a portable stitch guide sounds like a pretty good deal to me, but if it goes higher or back to $4.99, I don't know if I'd drop the cash.

It would be great if there was a way to upload patterns to take along too. That along with the stitch guide and fix-it tips would make this a very useful tool. Maybe the developer could hook up with pattern companies or sites, like Interweave Knits, Vogue Knitting or Ravelry. That would be pretty cool.

Tuesday, June 21, 2011

Needing cover suggestions

So I bought an iPad and now I'm looking for a way to keep the screen protected.

I could buy a cover, but I'm thinking I could save money by making one. Plus, I'm sure I could make one much more attractive looking than the ones currently offered through Apple.

Jennifer over at CraftSanity has made a really neat one for her husband. If I were to make it though, I would probably try to figure out a way to add a plastic screen cover.

Other bloggers have great tutorials too: Dixie Mango, One Shabby Chick and Craft Gossip.

I will probably try and make one using fabric I have on hand, though I haven't ruled out making a run to the store. I may have to stop by a fabric store if I plan to make a cover with a plastic window.

What are your thoughts? Any suggestions? Is fleece or cotton material with interfacing sturdy enough or should I opt for upholestry fabric? Color schemes?

Friday, June 10, 2011

The Knit and Crochet Show

The Knit and Crochet Show is coming to the Greensboro, N.C., area in September. Will you be there?

I learned about it from Ravelry friend hartroadhomestead. So, I've emailed Mom and my sis to see if they want to go to the Greensboro show, which is Sept. 23-25.

There's also a show in Minneapolis, Minn., in July. Might want to check that one out if it's closer to you.

The show features vendors of yarns and notions for knitters and crocheters alike.

There's also classes and several special events, like dinners and fashion shows.

I don't think we're going to take in any classes as they're pretty expensive. But we're talking about going at least one day to check out some yarn and other events.

Cost is $10 for one day and $5 for each additional day. That cost isn't too bad. Plus, you can grab a coupon off the event's website here.

You can register for the event here.

Hope to see you there!

Thursday, June 9, 2011

Much improved skirt

I spent the largest part of this week in N.C. since I had something to do down there every single morning -- meetings, a doctor visit, you name it.

Since I was going to be there for a while and I had a lot of mending to do, I grabbed a bag and stuffed it with a tank-top, shorts and a couple of skirts that needed fixing.

Thanks to Mom, I was able to complete every single one of those projects! Mostly because she fixed the hole in the collar of the tank top, placed a dart in the shorts so they fit better and forbid me to touch one of the skirts because I managed to mess up the waist band.

The skirt is made from a stretchy knit and, over the course of a day, stretches out so much that I have to tug it up very few minutes. So I needed to take it in. Originally, Mom placed two darts in the back and that took care of that problem.

I also didn't like the rolled hem, so I tried to hem it up. To get the material to lay flat, I knew the side seams needed to be tapered outward. So I did that. Then I wanted to cut off the excess side seam material. Doing that I some how cut off the bias tape binding around the waist, leaving a gaping hole.

Mom rescued the skirt. She took out the darts and sewed up the side. Then she set to work hemming the bottom ... refusing to let me get near the "poor ol' skirt.

While she did that, I got to work on some other projects. The second skirt didn't fit all that well so I left it for my sister-in-law and the last skirt I worked on myself.

The skirt was long and beautiful, but I don't look good in long skirts. It's one Nannie gave to me a few winters ago and I've worn it mostly during the fall and winter with brown boots.


So I decided to cut it off and add lace to the bottom.


I went to put the skirt on last night to take a picture and the zipper broke. Mom got home and found me trying it get the zipper back together. "What did you do now?" she asked. "Why do you go to fix the hem and wind up messing up the waistband?" she teased me.

So we made a run to Hobby Lobby for a brown, 7-inch zipper and this is the result.


I love it!

Tuesday, June 7, 2011

Win some Crafty Chica books

Corinne Leigh over at Craftovision (formerly of Threadbanger) is hosting a give away with Kathy Cano-Murillo, a.k.a. Crafty Chica.

Cano-Murillo has started writing novels and she and Corinne are giving away two. To win 'em, you have to like Craftovision and Crafty Chica's Facebook pages. You can do that here and here.

To learn more, watch the current Craftovision video:

Monday, June 6, 2011

Progress is slow, but at least there's progress!

Look what I found in the garden this afternoon!


This is the first thing I've pulled from the garden this year. We planted the summer crops late because of the rain we had for a month or more. And now it's so hot, the plants are struggling to hold on.

But this little pea pod gives me hope! I found two more pea pods starting to grow and a couple more blooms on the vine.

So, there's still hope for the spring crops and I'm cheering on the summer crops. :)

Leafy Embroidery

It's finished! I completed the embroidery on my polo-to-tank-top shirt on Friday evening. Not too bad for an old men's polo shirt, huh?

Haa, haaa! I like this picture of me scratching my head.
Chris meant it as a joke, but I think it's one of the best shots he took. :)

I really don't like having my picture taken. Blah!
This is probably the best "normal" shot  Chris took.

What do you think?

You can read more about the changes I did to the top here. I used BurdaStyle's Sadie pattern.

Here's a close-up on the stitching around the collar.

The spot on my neck is actually in the camera. We thought it was the lens, but it's actually on the mirror or something else in the camera. Can't seem to get rid of it.
I used a decorative stitch on my old Singer called "Sephora." What do you think?

You can see where the embroidery hoop was. :)
The embroidery pattern comes from Jenny Hart of Sublime Stitching. I used her "Sublime Stitching: Hundreds of Hip Embroidery Patterns and How-to" book. I love how the embroidery thread matches the collar and sleeve thread!

Wednesday, June 1, 2011

From Polo-to-Tank Top

My second knit, my first tank-top and my first refashioned item!

My polo-to-tank top

An old polo shirt.

I used BurdaStyle's Sadie pattern and cut up one of Chris' old polo shirts. The top is just a bit snug, but I like it. I can't wait to wear it over and over again!

I had a little trouble with the bias tape binding. The pattern calls for cutting up strip of fabric to use as the binding, which would have been less stiff than the bias tape, but I didn't have enough polo shirt to do that. I don't really mind the stiff binding as I think it gives the shirt and interesting look.

I also didn't like how blind hemming the tape looked. The thread was a lighter green (I didn't have a dark green spool on hand) and I thought it made the collar look tacky.

So, using a stitch called "Sephora" on my old Singer, I decided to do a decorative stitch instead. I like how it turned out. What do you think?


I originally had planned to add flowers or something along the left side of the collar, but the best I could come up with, using what I had, was this:


Too juvenile for a 30-year-old woman, me thinks.

I could have left the top plain; it's all right like that. But, to me, if you're making something, you're able to put your own personal touches on it and make it yours. So why not go all out? I felt the top still needed something, but what?

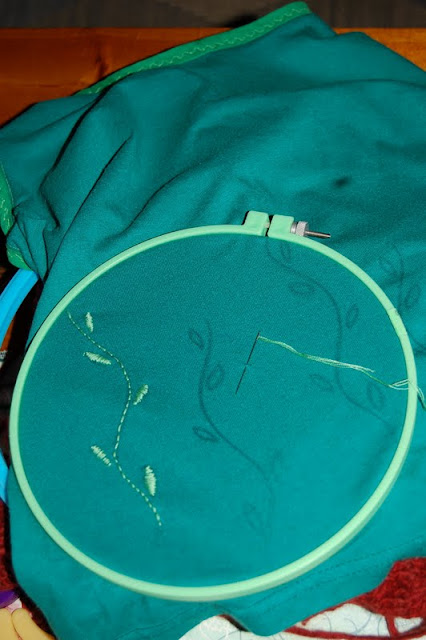
I flipped through Jenny Hart's "Sublime Stitching" book I picked up last Christmas while visiting my parents. I decided on a border along the bottom front of the shirt like this:


What do you think? I think I'm going to love it!

The embroidery floss matches the Sephora stitching pretty well and makes the top look more interesting. I can't wait to finish!

And it shouldn't take long. I finished the first vine in one evening. I'm using a simple backstitch for the stem and satin stitch (my first attempt at this stitch!) for the leaves.

(Thanks, Mom, for teaching me the basics of embroidery and thanks, Jenny, for this awesome book!)

Squash ideas

So just about this time of year, if you have a garden or have family/friends who do, you're probably inundated with summer squash.

Usually I feel pretty limited in what I can do with all the crooknecks, butterstick and zucchini squashes. I like them sauteed with some butter or olive oil, fried or served as fritters. And, of course, there's the zucchini bread I usually make at least twice during the summer and frittatas that make a good breakfast or dinner feast.

There's also creamed squash or casseroles, though I'm not a big fan of either of those.

I've also created a couple of recipes and posted 'em on this blog. The Late Summer Veggie Soup is good, but the warm Squash-Chard Salad is my favorite! Kale would go well in that recipe, too.

This past week, on a whim, I threw some fresh crookneck squash onto a salad. Wonderful.

I also cooked some squash with garlic and a green onion in an egg scramble and made a breakfast burrito. Awesome!

So, I encourage you to figure out different ways to eat up all that squash besides cutting it up and freezing it for goodness knows how long. It's a good way to get some healthy veggies into your diet!

Thursday, May 12, 2011

Free Pattern Month and buying fabric online

Hiya! Just a quick reminder to stop by Grosgrain to enjoy Free Pattern Month through the end of May. Click the button below!


Also, Rae over at Made by Rae is hosting her annual Spring Top Sewalong. Submissions should already be in and judges will soon narrow down the tops down to the finalists, which we'll get to vote for our favorite.

One of the judges, Deborah of Whipstitch Fabrics, shared how to buy fabric from online stores earlier this week. If you're anxious about buying fabric online, stop by Whipstitch Fabrics to see what Deborah says about picking out the best fabric for your project.

Wednesday, April 27, 2011

The Margie Shirt

It is finished!

The Margie
I'm calling this shirt The Margie after my mother-in-law. She gave me the material with a turtle-neck dress pattern that she never started. I think the fabric worked perfectly for this project!

It really didn't take that long to finish the shirt, but I didn't get down to the sewing room for a few weeks and it's taken more than a week to get this post up. So, what do you think?

I still had a little trouble with the neckband, but I figured it out after talking with my mom and grandma and looking at the pattern instructions again. It's not perfect because there's pinches of fabric here and there, but I really love how it turned out.

It's still been cool enough to wear this shirt and it's thin, so it's perfect for a cool spring day. I'm so proud and happy when I'm wearing it!

Here's the Kwik Sew pattern if you're interested and you can find it here:


I don't know why I waited so long to work with a knit! I've always heard that knits are super hard and you should get comfortable with woven material before tackling this type of project.

Phooey, I say! This was so easy. It did take awhile to figure out how to put on the neck band, but the rest of it was easy-peasy. I can't wait to tackle my next knit!

And I am so happy I've discovered how to use the blind hem foot on my Singer. It's so easy and quick! Though I don't mind hand stitching a blind hem, I think my blind hem foot and I are going to be very close friends. :)

Also, though it's sacrilege, I also cut out this pattern instead of tracing. I usually insist on tracing patterns so that they will last longer, but I was impatient to get sewing.

I don't know why I make a big deal to save the pattern papers whenever women's styles change so much. If I limit the use of pins, it should help the patterns last just as long as it would otherwise, right?

I'd much rather spend what little time I have sewing, not tracing. So, I think my days of tracing maybe over. I'll hold onto the tracing paper to make my own patterns and for drafting, if I ever progress to that level of seamstress.

Saturday, April 23, 2011

Zucchini (Squash) Fritters

After making zucchini bread for the National Scrapbooking Day scrap last weekend, I had a lot of leftover grated veggie. So I made zucchini fritters!


This is actually a recipe called squash fritters, which I use summer or crook neck squash to make. Zucchini, of course, is a type of squash, so works perfectly in this recipe, too.

Squash Fritters
6 squash, boiled and mashed or grated
1 egg
1 small onion, minced or chopped
breadcrumbs
salt and pepper

1. Mix everything together.
2. Pat out into patties or spoon and drop into oil in frying pan at medium heat.
3. Cook until brown on each side and serve.


Chris loves when I make this. We prefer to eat squashes sauteed or steamed, but if we've got some in the freezer or canned, I make this. We eat 'em with ketchup.

Friday, April 22, 2011

Grosgrain's Free Pattern Month starts Monday!

Kathleen over at Grosgrain announced this morning that Free Pattern Month begins Monday!

The event coincides with Kathleen's announcement of changes taking place at Grosgrain. You can read about those changes here.

Click on the button below to go visit. I'll also post this button on my page so you can easily find it in the future.


Zucchini Bread

For the National Scrapbooking Day scrap, our hostess, Judy, asked us to bring a snack (on Friday night) or dish (Saturday lunch) to share.

On Friday I took plain and roasted red pepper hummus and crackers. For Saturday, I warmed up the oven and made my first zucchini bread of the year.


I always get rave reviews when I make this bread. It's almost like eating cake! And it freezes well, too.

Notes before you begin:
1. I never peel the zucchini. I always just wash it good and grate it with the skin on. I love the green flakes that show up in the bread. This is a good way to use up zucchini that may be a bit past it's prime -- a little too soft to cut up and saute but still good enough to eat.
2. I usually don't add nuts to my baked goods because I don't like the texture. But feel free to throw some in. I think pecans would go perfectly with this.
3. For this go round I cut the amount of sugar to 1 3/4 cup -- 2 1/2 cups seemed like an awful lot for two loaves of bread and I knew there would be enough sweet things to munch on at the scrap. The bread still tasted wonderful, even with the less sugar!
4. Usually one medium zucchini will make the 2 cups you need for the recipe. I grated two because just one was a tad too small for the amount I needed. I used the extra grated zucchini in another recipe, which I'll share tomorrow.

Here's what you do:

3 eggs
1 cup oil
2 1/2 cups sugar
2 cups zucchini peeled and grated
3 tsp. vanilla
3 cups flour
1 tsp. salt
1 tsp. baking soda
1 tsp. baking powder
3 tsp. cinnamon
1/2 cups chopped nuts (optional)

1. Preheat oven to 325 and grease two loaf pans.
2. Beat the eggs and then add the oil, sugar, grated zucchini and vanilla. Mix until blended.
3. Add flour, salt, baking soda, baking powder, cinnamon and nuts. Mix.
4. Pour into loaf pans and bake for 1 hour.

And, most importantly, don't forget to share with someone special (see below).

Sidney's waiting for me to drop some crumbs. She always helps me out in the kitchen! :)